Exile arma 3 что это
Гайд по строительству и крафту в моде Exile
Небольшой гайд который поможет быстро освоить процесс строительства и крафта в моде Exile. Это небольшая часть более подробного руководства, ссылку на нее мы указали в конце статьи.
Описание дебага при постройке
Крафт и рецепты
Некоторые рецепты требуют дополнительных “приспособлений”, будь то сковорода,спички или окружающие условия (море,огонь, источник воды) итд. Скрафтить можно сразу несколько предметов, для этого достаточно выбрать нужное кол-во из доступного вам. Крафт происходит мгновенно, без анимации.
Самое необходимое
Бревно
Для добычи необходим топор.
Является первоначальным элементом стройки. Необходим для крафта кострища, верстака и досок.
Metal Board – Металл. пластина
Используется для сборки “Portable Generators” (портативный генератор).
Для 1 Portable Generator необходимо 4 x Metal Boards
Metal Pole – Металл. труба.
Использутся для сборки “Flood Light Kits” (сборочный пакет прожектора).
Для 1 Flood Light Kit нужно 1 x Metal Pole
Rope – Верёвка
Используется для сборки “Wood Draw Bridge”(откидной мост через ров(пока не имеет текстуры,вырезан))
Для сборки Wood Draw Bridge необходимы,помимо всего прочего 2 x Rope
Другие вещи которые можно скрафтить.
Портативный генератор.
Для подсветки своей базы вы можете установить прожекторы по тёмным углам, для их запитки необходим генератор.
Flood Light Kit – Сборочный набор прожектора.
Используется для подсветки своей базы/территории. Питается от генератора.
Стройматериалы “Дерево”
Work Bench – Верстак
Необходим для крафта практически всех вещей. Перед началом стройки самая первая деталь для установки.
Рецепт :
Собирается из 2 х Wood Logs(Бревно). Используется в данных стройматериалах:
Storage Crate – Ящик
Используется для хранения ваших вещей. Не закрывается.
Wood Wall – Деревянна стена
Собирается из 4 досок возле верстака. Далее может использоваться для сборки ещё 3 видов коснтр. материалов. НО, обновлять стену нужно до установки.
Wood Window – Деревянная стена с окном.
Собирается из комбинирования Стены и 2х Досок возле верстака. Обновлять стену до стены с окном следует ДО установки.
Wood Floor – Деревянный пол.
Собирается из 4х Досок, рядом с верстаком.
Wood Floor Port – Деревянный пол с проёмом
Собирается из 6 Досок, рядом с верстаком. Используется для создания возможности установки лестниц между этажами.
Wood Stairs – Деревянная лестница
Лестница – причина смерти у 20%+- населения игр серии Арма.
Собирается из 6 Досок,необходим верстак поблизости.
1/2 Wood Wall – Половина стены
Можно использовать как ограничитель на краях крыши, возле лестниц итд, на что хватит фантазии.
Собирается из 2 досок, возле верстака.
Стройматериалы “Металл”
Пока что как таковых элементов из металла нет.
Однако уже сейчас можно апгрейдить свои деревянные постройки, обшив их металлом.
Для этого понадобится:
Fortification Upgrade – Обновление укреплений
Для сборки понадобится:
Далее с данным предметом необходимо подойти к стене, и используя колесо мыши выбрать пункт “Upgrade”
Стоит отметить, что данный крафт можно увидеть только на предметах Metall Pole и Metal Board
И в итоге получам что-то типа этого :
Оригинал и полный гайд. Довольно подробный гайд по моду Exile для ARMA 3, который подробно описывает процесс крафта и строительства, управление в моде, систему рангов, лут, кланы, группы и т.д
Exile мод ARMA 3
Exile очередной мод посвященный выживанию. Песочница отличается от остальных подобных модов в основном идеей и в ней нет постапокалиптического мира. Теперь мы будем выживать на острове тюрьме, среди заключенных и играть собственно заключенным.
Скачать Exile Mod для ARMA3
[ STEAM | ОФСАЙТ | RUS | ЛАУНЧЕР ]
Команда упорно трудится, чтобы уже этим летом 2015, мы могли получить наш большой тюремный Остров.
Этот проект впитает в себя, все самое лучшее, что есть на сегодняшний день.
Воплотить все самые лучшие идеи и наработки.
Захват территорий, Создание Кланов, Новая система постройки зданий,
Новые элементы, Новая система торговли, Новый транспорт, Выбор точки возрождения и спуск на парашюте, Появление лута в зданиях по категориям, и т.д…
Греция 2039 год, после сильных конфликтов ресурсы сильно истощены. Европа страдает от сильного кризиса новой инфляции, повысился уровень преступности на самый пик в истории. Члены Организации Совета Безопасности Североатлантического Договора, вынуждены реагировать. Будучи отчаянной альтернативой в переполненных тюрьмах, было решено, отправлять преступников в ссылку. Греческий остров, стал новым домом для изгнанных в ссылку, а именно домом для вас, где выживает сильнейший. Создай свою общину, что бы выжить в этом непредсказуемом мире, в которой идёт борьба между жизнью и смертью.
Инструкция по установке Exile Mod
Далее описана инструкция по установке Exile Mod на Arma 3 сервер.
Для начала вам нужно заказать игровой сервер Arma 3 у нас на игровом хостинге или заказать VDS сервер и установить Arma 3 сервер на нем.
После чего приступаем непосредственно к установке самого мода.
Шаг 1.
Первым делом скачаем серверную часть мода с официального сайта и распакуем скачанный архив.
После распаковки вы увидите две директории: Arma 3 Server и MySQL.
Все, что вы увидите внутри директории Arma 3 Server (кроме battleye), нужно закачать через FTP в корень вашего игрового сервера.
Как подключиться к FTP своего игрового сервера описано в нашей инструкции здесь: Подключение к FTP игрового сервера с помощью программы FileZilla.
Шаг 2.
Мод требует для своей работы MySQL базу, поэтому следующим шагом нужно настроить все, связанное с этим. Переходим к созданию базы данных.
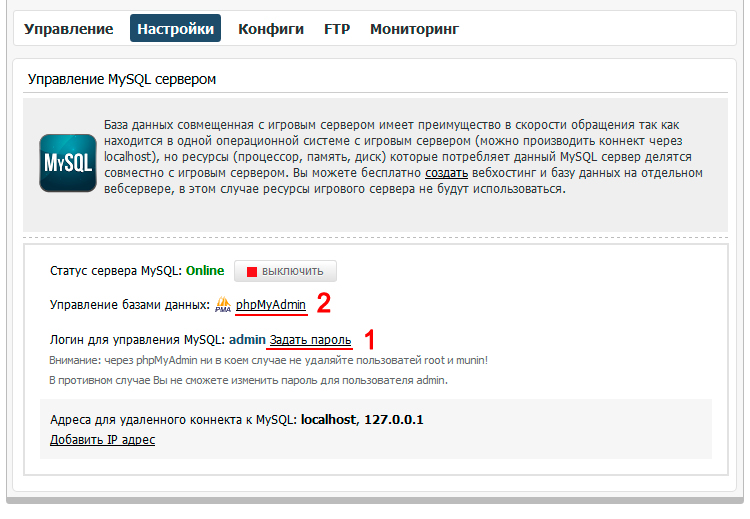
Для вашего сервера можно включить и настроить локальный сервер MySQL в разделе «Настройки».
В настройках MySQL сервера нужно указать пароль для пользователя admin (Рисунок 1).
Заходим в phpMyAdmin по ссылке на странице и авторизуемся по логину admin и паролю, который вы указали.
Далее нам необходимо создать саму базу данных и нового пользователя к ней, которые будут использоваться для мода.
Переходим в раздел Пользователи для создания пользователя.
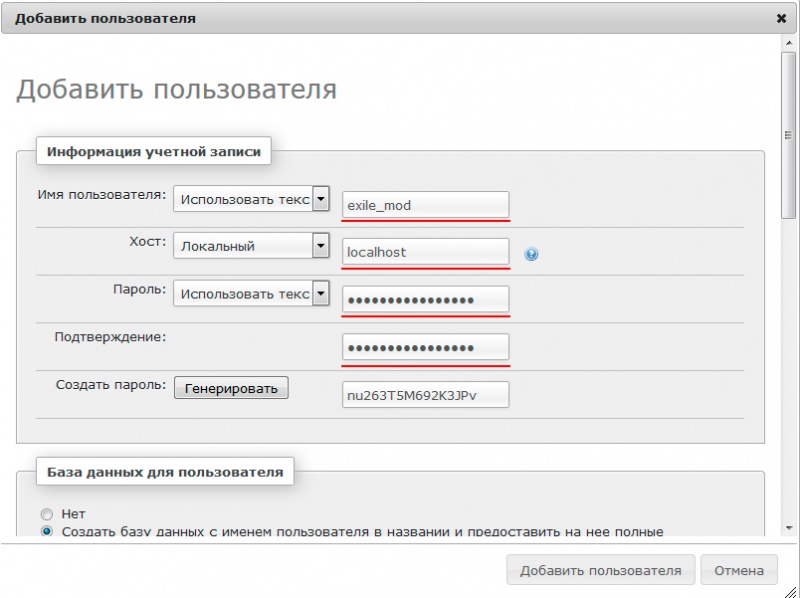
В этом разделе нажимаем Добавить пользователя (Рисунок 2).
В появившемся окне вводим данные для создания пользователя (Рисунок 3):
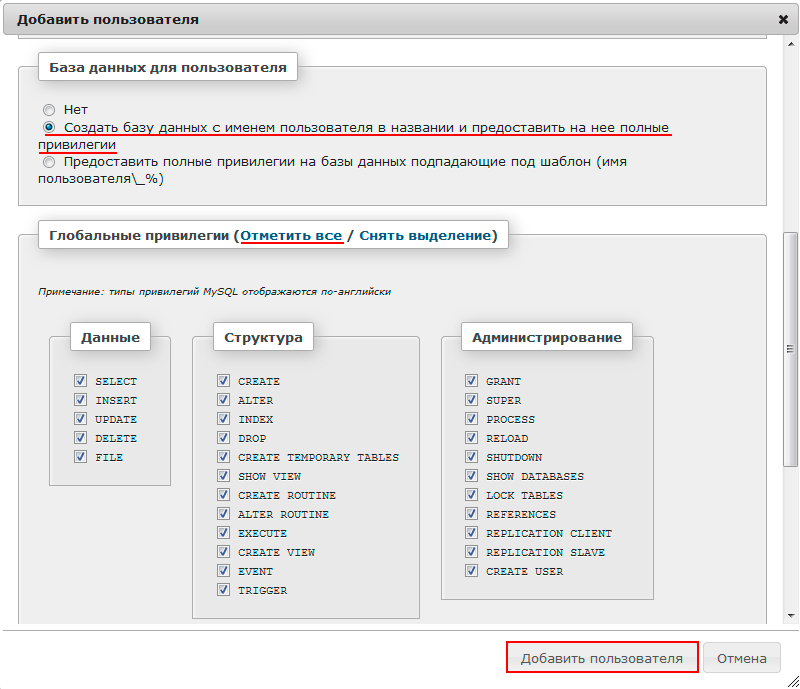
Прокручиваем вниз, в разделе База данных для пользователя отмечаем Создать базу данных с именем пользователя в названии и предоставить на нее полные привилегии (Рисунок 4)
Ниже отмечаем все глобальные привилегии и нажимаем Добавить пользователя (Рисунок 4).
Создание базы данных и пользователя завершено!
И так, вы создали базу данных и у вас есть на руках все данные, необходимые для подключения к ней.
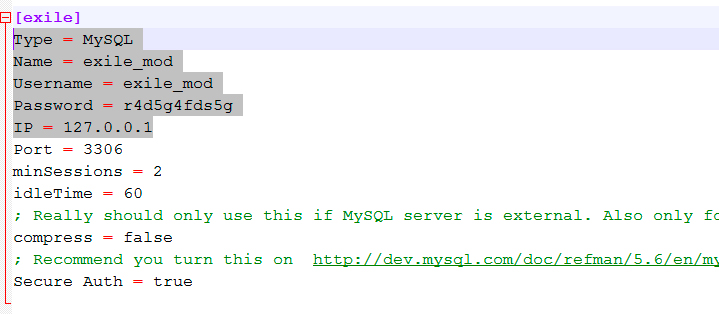
Настроим мод для работы с вашей базой. Откроем через FTP файл на игровом сервере, который располагается по следующему пути: /@ExileServer/extdb-conf.ini
В самом конце файла располагают настройки подключения к базе данных. (Рисунок 5)
Шаг 3.
Мод для работы с MySQL базой данных настроен. Теперь требуется создать структуры базы, куда мод будет записывать данные.
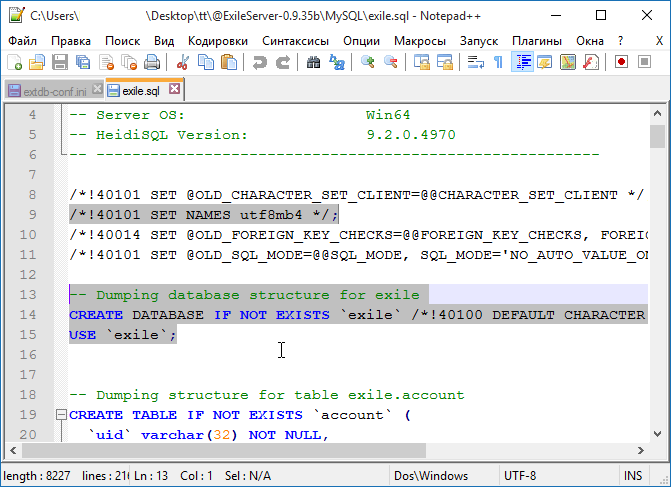
В распакованном на первом шаге архиве, откроем директорию MySQL и через блокнот откроем файл exile.sql
В нем нужно удалить три строчки, которые выделены на картинке серым. (Рисунок 6)
Эти строки отвечают за создание базы данных, но т.к. база данных создается через панель управления веб-хостингом и база у нас уже создана, то тут они не нужны, поэтому их следует удалить, после чего сохраняем файл.
Шаг 4.
Теперь нужно зайти в PhpMyAdmin. Ссылку на него можно найти в разделе Настройки в управлении MySQL сервера.
Для входа в PhpMyAdmin нужно ввести имя пользователя и пароль от базы данных, которые вы вводили на 2 шаге инструкции.
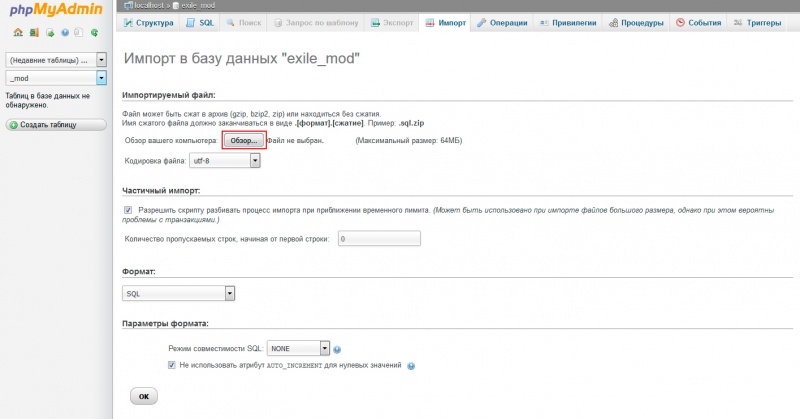
После входа, в левом меню выбираем вашу базу данных и переходим во вкладку Импорт.
В открывшейся вкладке, нужно нажать на кнопку Обзор. и выбрать файл exile.sql, который вы только что отредактировали.
После нажатия ОК внизу страницы, в левой колонке PhpMyAdmin вы должны увидеть, что у вас появились таблицы.
Шаг 5.
Мод настроен, теперь необходимо настроить сам игровой сервер.
Открываем файл server.cfg в корне сервера через FTP или через панель управления.
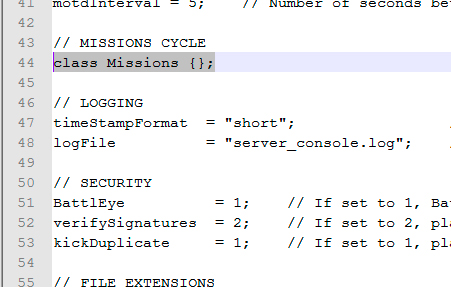
В середине конфигурационного файла есть строка, отвечающая за миссии, с которыми запускается сервер. (Рисунок 8)
Чтобы сервер запускался с нашей миссией от Exile мода, изменяем эту строку на следующий текст:
Шаг 6.
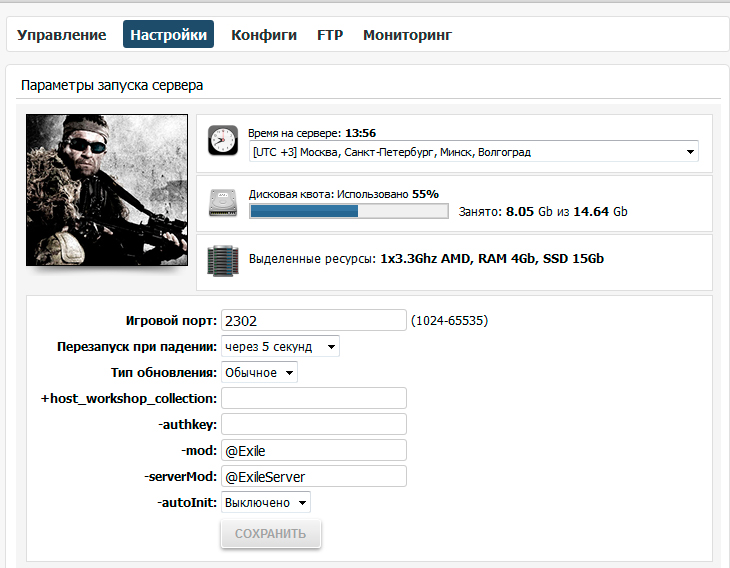
Теперь нужно настроить параметры запуска игрового сервера. Открываем раздел Настройки в панели управления игрового сервера. (Рисунок 9)
В параметре -mod указываем @Exile
В параметре -serverMod указываем @ExileServer
Включите параметр -autoInit, чтобы мод загружался автоматически при старте сервера, в ином случае мод начнет загружаться только после того, как зайдет первый игрок.
И нажимаем кнопку Сохранить.
Шаг 7.
Сервер полностью настроен, осталось только загрузить клиентские файлы.
Скачиваем их с официального сайта и распаковываем.
Директорию @Exile из распакованного архива нужно закачать через FTP в корень игрового сервера и в корень вашего клиента Arma 3.
Запускаем сервер.
Проверить запустился ли мод Exile можно следующим образом:
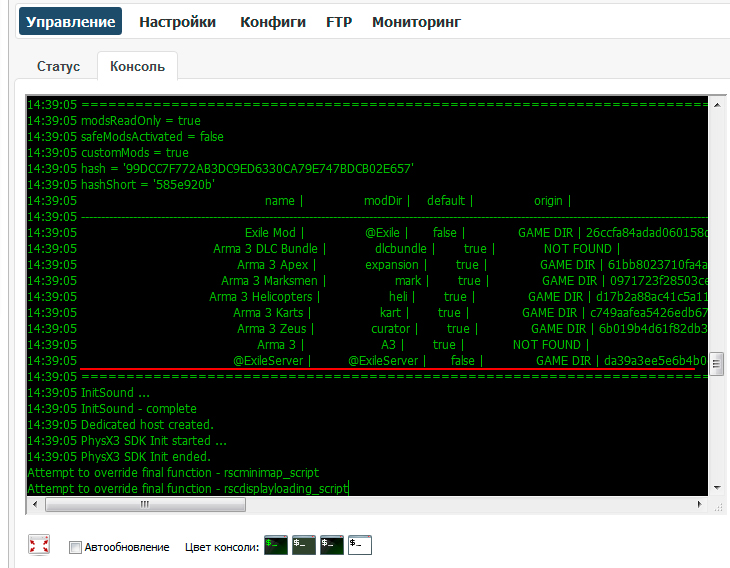
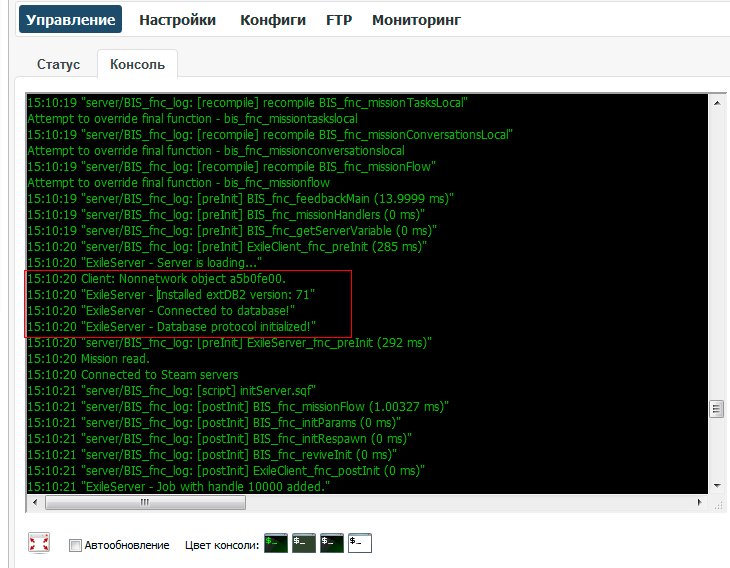
Открываем консоль сервера и ищем выделенное (Рисунок 10 и 11)
Если присутствует выделенное, то мод Exile работает на сервере.
Шаг 8.
Запускаем лаунчер клиента Arma 3.
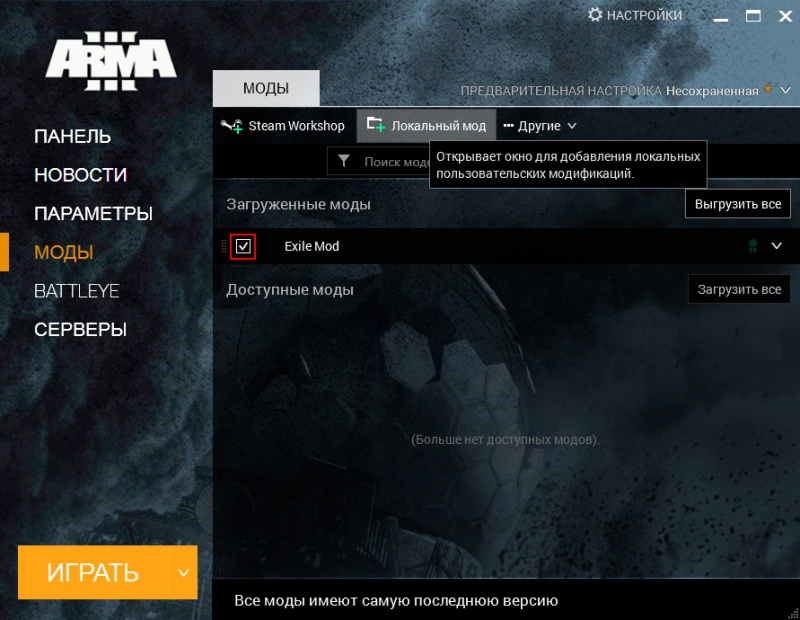
В лаунчере Arma 3 нужно добавить директорию с модом. После чего он появится в списке, как показано на картинке. (Рисунок 12)
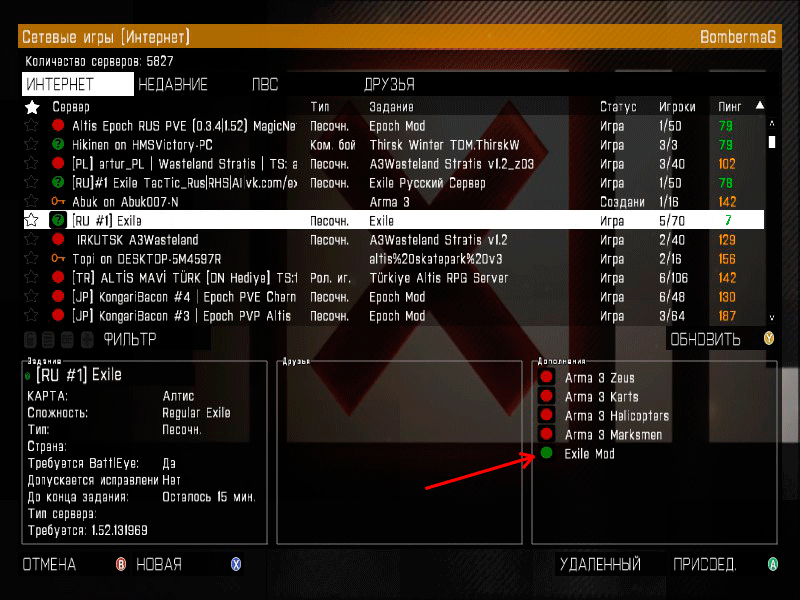
Запускаем игру, добавляем сервер в избранное или находим его по поиску и убеждаемся, что на сервере работает Exile Mod и что он также присутствует в клиенте игры. (Рисунок 13)
Можно заходить на сервер и играть.
Exile arma 3 что это
First things first, you will need the actual Exile mod.
Download the client file from one of the mirrors, NOT via the Arma 3 Launcher (Not using the launcher is the main reason for this guide, its fine if you want to use it but heres why I don’t: Its slow as ♥♥♥♥ to download larger files and it doesnt have all the mods I needed to play on the servers I wanted to)
The most confusing part of getting into modded servers in Arma for new players is identifying which mods and versions are required for the server you wish to play on. This is the major benifit in using a third party launcher over doing it all yourself, but once you have the hang of it its better doing it yourself IMO.
Most servers list the mods required in their name on the server browser or you can look up their website, most of the decent servers will have details and instructions for joining on their website as well as links to the mods needed. Shout out to [ARC] clan for the great guys that operate the helpdesk in their Teamspeak.
To find out what you need to play, look at the server you want to join in the server browser.
Single click the server in the list and look at the bottom right of the server browser screen, you will see a list of mod names with either red or green dots next to them. Ignore the ones for the official DLC (Helicopters, Marksman, Carts etc) and check the mods listed below them.
The mods you need will be listed here and have either:
Steams Workshop is probably the most straightforward way to get the mods you will need to play on servers that aren’t just running the vanilla Exile mod on the Altis terrain.
Theres a couple of mods you will have to get from Armaholics/teh Internets but most are taken care of. They’re also easy to install, simply click the link to the mod you need and click the subscribe button. Some mods, such as CUP Weapons, will be dependant on others that they use as a foundation and Steam should prompt you to subscribe to these as well.
This list is not complete I’m sure but here’s the ones I’ve compiled so far. If anyone has others that should be added to the list please leave it in a comment below.
Exile arma 3 что это
If I missed anything please feel free to let me know in the comments. Thanks to everyone who helped with the guide!
Special thanks to: [KSG] Bullseye122, [KSG] LoneKirov, Vishpala & the Exile Dev team
Visit us Kill Shot Gamers [www.killshotgamers.com]
For those of you who are part of gaming communities or other gaming organizations please feel free to post a link to this guide and utilize it. You do not need to ask me permission although I appreciate that you do It was intended for everyone to use! Thank you to everyone for your comments and suggestions!
It is the year 2039. After the resource depleting conflict in Greece, Europe suffers from a new deflation crisis, leading the crime rate to a new peak in history. Members of the North Atlantic Treaty Organization Security Council are forced to react. Being a desperate alternative to overcrowded and prohibitive prisons, offenders are now being sent to EXILE.
So now that you know the backstory let’s get into it. In this guide we will go over the basics of spawning, looting, trade, building and basic gameplay.
All graphics used in this guide are my own and/or from Bis & the Exile Mod Team [www.exilemod.com] This guide is intended for quick reference while in game through your steam overlay. Enjoy and Happy Gaming!
Hello there! We have been asked by our testers to implement earplugs, so here you go! Press “5” ingame to toggle them. While the earplugs are “active”, you will see an icon in your HUD to remind you. Yes, it is a small feature, but a great one.
Gear & items in backpacks have always been an issue when trying to store your items in safes or vehicals. Well now that it is over! You can easely store your items in a backpack and shove that sucker into a car, crate or a safe and your items will remain there even after restart.
You can doubleclick backpacks, chest rigs and move items in and out of each other with much more ease or having to dump them on the ground!
The XM8 is some kind of PDA that replaces the default watch item of Arma. It will be used to communicate with other players to create parties, families, manage your territory, lookup server rules, gamble on the sloth machine, Set off your breaching charges – and so much more!
**Coming Soon**
Exile servers are online 24/7, but players are not. Balancing base raiding in persistent online games is extremely challenging, if not completely impossible. All video games in this genre struggle with that, especially when the victims are not online. There is no common solution for that issue in this genre, so we are were thinking about something completely new. And the result is a smartphone app.
We have been working on a new HUD in Exile to replace the original one of Arma. The primary goal of it is to remove visual clutter and noise, increase usability in general and give Exile a unique ingame look (besides the ingame color grading).
Hope you like it!
So the video is our real time ingame color grading. It basically adjusts the colors of Arma while you are ingame, adding a more realistic touch to the game!
This is the first tiny video we want to show. Since Exile features a weather, date and daytime system, we have also implemented a bright nights modification. You will still benefit from night vision goggles, but … see for yourself
Although the guards can be very brash with how they treat you as a prisoner, they do give you the option of where they drop you out of the plane. After connecting to the server you will be met with a list of Spawn Locations which you will be able to chose from. Kavala, Zaros, Selakano, Pyrgos, Athira, Sofia, or Random. Once you have made this decision and click the Spawn button you will begin your descent into Exile by parachute.
Spawn locations may be different depending on the map and the server you are playing Exile on.
You will be able to steer your parachute and control its speed in order to find the perfect landing location. Be sure not to hit the ground going too fast or your fresh new beginning on the island will be cut very short.
You will dropped into Exile with nothing but a stylish orange jump suit so after you land you can immediately begin searching for items in the area, or scan the land on your way down to find that spawn vehicle to get you from point A to point B. If you look hard enough you may just find the bicycle that will save you countless steps. If you have no place better to be then, it’s time to start gathering materials/clothes and weapons and find yourself a place to call home.
The loot spawns directly on the ground/floor, not in containers. You will be able to find building-category related loot, thus military buildings will spawn military loot etc. There are high-loot areas where you can find rare items.
Keep your backpack clean as possible, when looting you want to keep Military clothing such as Uniforms / Weapons / Chest Rigs / Backpacks & Helmets in your backpack. These items will only go into your backpack so its important to carry Ammo & Food in your uniform and chest rigs. Military items sell for more than civilian clothing and is a good source of income when first starting out.
In Exile we have changed some of the ways Arma 3 will notify you of Connection, Voice and your players status in Exile. Here are some of the new HUD icons you will see in Exile:
The «Bambi Status» Icon signifies you are a bambi!
This icon appears when your thirst goes below 25%, better drink fast!
This icon appears when your hunger goes below 25%, go stuff your face!
This is the «Red Chain» in Arma 3, your are loosing conneciton.
This is the «Yellow Chain» in Arma 3, you are about to loose your connection.
Shows you are in «Combat» and can not log out, or build anything.
Shows you are «Bleeding» out and you may perish if you do not stop the bleeding!
This is your «Auto Run» Icon, will let you know you are currently in Auto Run. Key #0
This is your «Ear Plug» Icon, shows you have your earplugs in! Key #5
Exile uses simplified survival mechanisms, which boils down to hunger and thirst. Both of them are bound to your ingame activity. If you like to camp, you will not become thirsty/hungry fast. But if you run for ages, you will become thirsty very quickly. As a side note, they have removed fatigue completely, so you can basically run forever, forest!
You can consume your food/water by double clicking on said item. Also filling water bottles works the same way, but need a water source to fill the empty bottles. You will find the «Fill Water Bottle» in the recipes list. Water sources include the ocean (salt water) if consumed you will loose health and die. And dirty water which you can find from pumps or water collectors. Dirty water will not kill you but should only be consumed in a pinch. Food comes in two forms either they can be eaten right when you pick them up i.e. EMRE, Moobar, Raisins, etc. OR they will require a can opener to be consumed.
You can cook Salt/Dirty water in a «cooking pot» by a fire to turn it into fresh water. You will need an «axe» to chop the wood need to make the fire and «matches» to start it. Canned food items can also be cooked to boost how much hunger they will fill when consumed.
You can find water sources in the cities, here are some water sources below:
You can buy water & food from the «Fast Food» vendor for Pop Tabs in trader city:
Once you consume your water from the trader keep your empty bottles, you can use them to collect water for future use. You will also find food & water by looting, so buying isn’t your only option.
You can find «Fresh Water» by looting towns and villages, but the best way to stay hydrated is to collect dirty or salty water. Then boiling them to fresh water, It will always be a good idea to have an «Axe» / «Cooking Pot» & «Matches» on your person so you will not go thirsty.
Another way you can get fresh water other than the water sources listed above is the ocean! For this example of how to fill your water bottle we will use the ocean! So to collect water you will first need a «Empty Water Bottle«, as you can see in the picture below i have it selected in my inventory.
Once you have the bottle selected you will be given and option for «Details» or «Recipes«. You will want to select «Recipes» as seen below and select «Fill Salt Water»
As you can see that it is all green on the right side, this means you are ready complete your task. If you have any red on the right side it means your missing one of the components to complete your task. Also note with this crafting system you can do all your bottles or just some using the quantity selection on the bottom left as seen below:
Now you would be supprised on how easy it is to die from not paying attention to these two vital stats. This is located at the bottom left of your screen below your chat. Will look like this:
Once those hit %25 they will change to the color RED. This is a critical time and you need to pay attention to this and satisfy your characters need for food or water.
Open your inventory and double click on your water bottle or your food item. You should see a information screen detailing your water or foods statistica gains. On the bottom left of your information screen you will see the «Consume» buttom. Click it and you will eat/drink your item. Some examples bellow:
As well you can double-click an item to see the main attributes of it. A magazine will show the damage, tracer count, maximum speed etc. While a vest will show attributes like armor and capacity. If you ever wondered which backpack is the largest or which sniper has the highest range, now you know to double click the item. (Double Clicking in the vendor will purchase the item, only do this while item is in your inventory!)
Exile’s ingame currency is called “Pop Tabs”. That’s the tiny thingy that you use to open a canned drink. In the most recent update pop tabs have become a physical object and can be seen in your inventory and your XM8.
There will be a trader city where you can interact with NPCs. This trader city is the “Mafia” of Exile. There are different types of traders for different types of items. You will have full control of where to buy to or sell items from. For example, if you are not wearing a helmet and buy one, you will equip it automatically. If you carry a weapon with attachments and sell it, the weapon will be gone but the attachments will still be in your inventory. On top of that, you can directly buy and sell things from your vehicles cargo. Also, there is a “waste dump” where you can sell the content of your vehicles at once, so you can “clean” your base much faster.
There are also vehicle traders, where you can buy the base version of a vehicle, aircraft or boat. Beside the respective vehicle trader, you can go to the “vehicle customs” trader and buy new skins for that. We have planned to add more customizations over time, like custom car horns, bottom lights, nitro boosters, smoke defense systems etc.
Lockers are now located at trader city which is where you can store your pop tabs. You can store up to 999,999 pop tabs in the lockers currently, and they are completely private. To access the locker walk up to it and use your scroll wheel to go to inventory. You can also store pop tabs inside vehicles, crates, and safes. By default you can only store 10,000 tabs until the server owner changes the amount in the config files.
Respect is some sort of score that your character will gain over time. If you frag someone, you will gain respect. If you kill a bambi or a mate, you will lose respect. Respect is required to interact with the Mafia. For example, if you want to extend your territory, you will need respect. Thus you are forced to leave your base if you want to extend your base.
Selling items or using the waste dump will now earn you respect. Current ratio: 10 pop tabs = 1 respect. Respect now also has a level system which makes it so you must raise your respect in order to purchase better weapons, equipment, items, and vehicles. The current levels are as followed:
Level 1 = 0 Respect
Level 2 = 5,000 Respect
Level 3 = 10,000 Repect
Level 4 = 15,000 Respect
Level 5 = 20,000 Respect
Level 6 = 25,000 Respect
You do not have a maximum amount of respect that you can reach, these levels just make it so you must invest time and effort into the game so you can buy better gear, much like a level up system in a standard MMORPG.
Trader CitIies are scattered throughout the map, there you can buy and sell items to earn or spend your Pop Tabs. There are two types of traders, safe zone traders, and unprotected traders. Safe zone traders are located within a blue circle and make it so that vehicles and players cannot take damage within the circle. Unprotected traders have no protection and you are able to be damaged and have your vehicles destroyed while there. However some servers will have custom features added to these traders making it that so each trader has its own unique characteristics.

